Saturday, June 22, 2013

Pop, pop, pop, grin

If you've ever canned anything before, you know the title of this post is so true. There aren't many better sounds in the world than the can sealing and the little pop it makes after a you've canned something. I get a little too excited about that sound and if I miss one can popping because I'm out of the room, I will often contemplate re-sealing it just so I can hear it.
With a new baby in the house, I knew that I was going to get to hear that sound quite a bit as I can my own baby food for my little princess. Today, we made homemade butternut squash for baby girl, her favorite!

I start with 2 good sized butternut squash. Cut each one in half and scoop out the seeds. Then I place them cut side down in a shallow baking dish with about a half inch of water in the bottom. In to a 350 degree oven for about 35-40 minutes order until squishy (that's the technical term for the degree of softness you are looking for).


When they come out, they will have some brown dimpling on the bulb part and that's okay. Scoop out all the yummy meat and straight into the blender it goes.

Left over shells. Get out all that yummy meat!


Puree until desired smoothness. Occasionally, you will have to add some water to soften this up a bit or thin it out. Use any water that was left over in the baking dish, that way you aren't losing any of those yummy nutrients that may have baked out of the squash into the water.
Look at the amazing color in there!
While this is cooling down a bit, go ahead and soak your canning jars in some very hot water. I use the small jelly jars for baby food. They hold 4 ounces and the stage 2 foods that you can buy pre-made are 3.5 ounces, so the size is very similar.
Make sure that you also soak the lids to the jars to soften up the glue a bit so that they will be more apt to seal. One very important thing to remember when canning, NEVER reuse a lid. The replacements are cheap and I'd rather pay the little bit to ensure that baby girl doesn't get sick because the lid doesn't seal all the way and bacteria grows in her food. EWWW....

Fill the jars leaving half to one inch at the top. Place the lid on and then the screw top (but don't screw it as tight as it will go). Place the jars into a large pot of boiling water and then leave them in there for about 10 minutes.
Carefully remove the jars and leave them on your counter. Now, get ready...here comes that super great sound  you've been waiting for. Sit back and giggle with each pop!!
I can generally get 12 jars of squash from the 2 that I cooked.
Applesauce, squash, pears, sweet potatoes
I love making baby girl's food. I'm very fortunate that we have been able to breastfeed her for seven months now and that she has never received anything other than breast milk and the super yummy foods that we are making for her now.

Tuesday, June 18, 2013

Summer Pasta Salad

One of my most favorite meals that my fabulous mother taught me to make was a summer pasta salad. With our crazy family of 6, I'm all for quick, easy, and delicious meals that the kids will enjoy. Luckily, my kids love everything in this dish, so preparing it is a no-brainer!
Ingredients:
Box of thin spaghetti
yellow pepper
red pepper
green bell pepper
cucumber
grape tomatoes
Shrimp!
bottle of zesty Italian salad dressing

Cook the noodles. I'm obsessed with these noodles that Mueller's came out with. There is a full serving of veggies in every one cup of noodles! If you're not a veggie fan, this is a great way to get your veggies in and not realize you're eating them (also works for fooling little kids into eating veggies). They have a great texture and don't leave a weird feeling in your mouth like other pastas can.

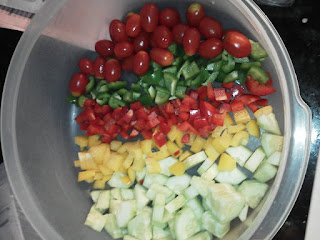
While the yummy noodles are cooking, cut up your veggies into small, bite sized chunks. You can add any veggies you would like, but there is no cooking other than the noodles, so the veggies will be eaten raw.

Isn't that beautiful?
 I found rings of cocktail shrimp on sale at the grocery store for $5.98 each and bought two of them for another dish. Forgetting that the other dish needed raw shrimp, that left two giant rings of shrimp to use for this pasta!
Once the noodles have finished cooking, drain them thoroughly. Add all of your beautiful veggies, pasta, and shrimp into one big bowl and then add about 3/4 of the bottle of Italian dressing. Refrigerate and enjoy tomorrow. Don't eat it the day you make it. The pasta has to have time to cool down.

Doesn't that look delicious?? And, it is very much diet friendly!!

Hope you enjoy this cool summer pasta dish as much as we do.

Friday, June 14, 2013

Letting go

I would imagine that most moms have the same gut reaction to school being out as I do, "What do I do with these crazy kids all summer?" As a high school chemistry teacher, my go to activities involve blowing things up or setting them on fire. But, my little bits tend to scared when they see flaming things flying through the air, so on to plan B.
We have found a list of 101 free/very cheap things to do this summer. I customized the list a bit from the original one I found on Pinterest and printed it out. We cut the list into individual activity slips and put them in a jar. Each morning after breakfast, Brooklyn, Isaac and I each draw an activity to do that day. There are a couple that we have to put back depending on if Nick is off work or not so one of us can stay home with the baby, but other than that, whatever we draw, we do!
I'll admit that this makes planning a day darn near impossible because we never know what we are going to be doing. This is very much playing with my need to be in control and have a plan and it does take a little bit of "letting go" to make it work. But, when your child is walking back into the house soaking wet from an impromptu water balloon fight and proclaims, "I love my life" it's easy to justify letting go.

Here is our list: (highlighted the ones we've already done)

1.       Go for a hike
2.       Scrapbook
3.       Catch fireflies
4.       Go to the zoo
5.       Tell ghost stories
6.       Go to the playground
7.       Pick flowers
8.       Take a bike ride
9.       Water gun fight
10.   Make S’mores
11.   Fly a kite
12.   Have a slumber party
13.   Build a blanket fort
14.   Make cookies
15.   Play in the sprinkler
16.   Make paper airplanes
17.   Go on a scavenger hunt
18.   Start a lemonade stand
19.   Plant a garden
20.   Swim in a lake
21.   Tell jokes
22.   Watch a movie
23.   Go on a picnic
24.   Play cards
25.   have a pillow fight
26.   Make ice cream
27.   Play in the mud
28.   Thumb wrestle
29.   Go to a museum
30.   Play hide and seek
31.   Blow bubbles
32.   Visit the library
33.   Fold origami
34.   Build a sand castle
35.   Take pictures
36.   Sing a song
37.   Make shadow puppets
38.   Build a campfire
39.   Slip n slide
40.   Play “Simon says”
41.   Sidewalk chalk
42.   Mommy-daughter make overs
43.   Daddy-daughter make overs
44.   Start a nature journal
45.   Play a board game
46.   Speak pig Latin
47.   Make homemade Popsicles
48.   Play charades
49.   Write a pen pal
50.   Michael’s kids crafts
51.   Play rock paper scissors
52.   Put on a magic show
53.   Start a garden
54.   Water balloon fight
55.   Play leap frog
56.   Magnify an ant
57.   Tell secrets
58.   Throw a ball
59.   Go cloud watching
60.   Have a “no talking” contest
61.   Story time at a library
62.   Visit a farm
63.   Play hopscotch
64.   Go fishing
65.   Have a staring contest
66.   Do a puzzle
67.   Play dress up
68.   Get a pet rock
69.   Tour a fire station
70.   Play with a cardboard box
71.   Climb a tree
72.   Throw a Frisbee
73.   Wash the car
74.   Go geocaching
75.   Decorate cupcakes
76.   Volunteer at the humane society
77.   Have a tea party
78.   Double dutch jump rope
79.   Go bird watching
80.   Find a 4-leaf clover
81.   Home Depot kids workshop
82.   Visit a national park
83.   Feed the ducks
84.   Learn to juggle
85.   Teach grandpa to text
86.   Have a yard sale
87.   Play I-spy
88.   Camp in the backyard
89.   Write poems
90.   Go star gazing
91.   Walk a dog
92.   Tour a factory
93.   Play with clay
94.   Make homemade cards to send
95.   Take a bus ride
96.   Paint with watercolors
97.   Tie dye
98.   Learn the Macarena
99.   Build with Lego's
100.                        Play tag
101.                        Go berry picking
We've only just begun our summer vacation and for the first time in years, I'm actually looking forward to the rest of it. Just looking at the list of things to do, how can you not get excited?

Wednesday, June 12, 2013

Mason Jar Sipper Cups

So, I did a short blip on this project earlier, but wanted to give more details with pictures for all of you visual learners (the inner teacher in me never sleeps...).
Step 1: Place jar lid on a scrap piece of wood.


Step 2: Drill hole in jar lid. I like to offset it a good bit so that it doesn't look like I was aiming for center and screwed up. I used the second largest drill bit in my husband's collection of drill bits. This hole is too small, but drilling with the big bit first creates too much shrapnel for my liking.
Shrapnel...This was after using the bigger bit to widen the hole.
Step 3: Remove any shrapnel with wire cutters.

Step 4: Insert rubber grommet into hole. This is a process, but don't fret, it will go in. I found it easiest to fold the grommet in half and then ease it around the hole.
I like these better than the first set because they are rounded on top and bottom.

Perfect fit. Man, it looks like it is time for a manicure...
Step 5: Get a lovely assistant to model your new creation, insert a plastic straw and sip away
Isn't she lovely?

 We are playing with ways to decorate the jars today.
This project is very simple, requires no special tools (other than the drill) and is very inexpensive!

Tuesday, June 11, 2013

Life's turns

I saw a wonderful art project on Pinterest that spoke to me. Wall art using magazines. Here is the original pin that inspired today's art project.
Seemed simple enough, so I thought I'd give it a go.
I started with tracing the circles and then cutting them out. That's a lot of circles...I need help. Thank heavens I teach high school and most of those kids are pretty good at cutting on the line. What started out as me tracing and cutting a bunch of solid colored circles out of magazines, quickly turned in to a bunch of teenagers tracing circles anywhere on a page where the template fit and then cutting that out. I wanted only solid colors, but what I got changed the art project. They saw texture and thought it was beautiful and I had to agree.
After an epic failure of a day today, involving children fighting over who sat where in the car, a diaper blowout with no change of clothes in the diaper bag and the water getting turned off due to the bill being one day late, I resorted to my happy place of crafting.
We started with painting a simple white canvas the same grey that I used on the bedroom walls. Two coats to thoroughly saturate the canvas with the beautiful grey.


Regular latex wall paint in a flat finish
 Next, Brooklyn and I stared at the original inspiration for a few minutes and I explained the project to her. Her interpretation was slightly different than mine. She wanted to just spread the dots out with no rhyme or reason to where they went. I was seeing them a little bit more ordered. But, after she placed a few dots on the canvas and asked, "Mom, isn't this just lovely?" we went with her way!

My original layout

My layout on the left and Brooklyn's on the right.
After they were placed, we had to take them all up to put a layer of Mod Podge down. Replace all those dots, and then Mod Podge two layers on top.

Love the canvas being the same color as the walls.

Another angle

LOVE IT!
My favorite part of this project was the transformation that it took from start to finish. Initially, the project was mine. Once I started asking for help with it, all the hands that were involved started to change the shape of the project. Each circle was cut out by one of my students. They selected where to place their template to trace thus adding their own individuality to "my" art project. Then the placement of the dots was transformed by Brooklyn's innocent placement of what she thought was beautiful. Though the end product is not what I envisioned at all, it is so much more and I wouldn't change a thing.

Monday, June 10, 2013

Crafts in a flash

I am a huge fan of my children's early bed times. The younger ones still start their bed routine between 7:00 and 7:30. That gives me and the hubby some good quality time together to unwind from the day. Although, it is very difficult to convince them that it is time to get ready for bed when the sun is still shining (hate the summer for this reason). Last summer, I remember telling Brooklyn to get ready for bed and she looked at me and said, "But mom, it's a bright sunny day." I guess we may need to look at rolling their bed time back a tiny bit. But even if we did, 8:00 would be the absolute latest that they would be in bed. So showers still starting around 7:30. Kids need their sleep!!!
Anyway, last night after dinner, I was feeling a little bit crafty. Just a little bit, not a lot. So I did a quicky craft. Something simple, quick, and got the crafty bug out of me for the night.
Brooklyn had an old "B" letter from my time selling Thirty-One bags. It was brown and cream paisley and just did not match her new room. So, we decided to cover it. I had some left-over t-shirt scraps from the 4 memory quilts I made last week so we started playing with them. I didn't take pictures during the process, but the end result was awesome! Just some hot glue, old t-shirt scraps, and the letter.

Perfectly matched to her new room and perfectly Brooklyn!
The other quicky craft I did was actually fully done by my husband! Start to finish, he crafted (not sure that is a word or not, but I'm using it anyway).
Like any good man in the south, my husband loves drinking out of mason jars. Not really sure the obsession, but whatever. So, following a Pinterest find, I sent him to the hardware store to buy rubber grommets. Once home, he drilled a hole in the lid of the mason jar using a smaller bit first and then a larger one to make the hole bigger, inserted the grommet and put a plastic straw in. Screw on the lid and Ta-Da, mason jar with a straw.

I love all things crafty, and I am the least creative person you will ever meet. However, I'm not scared to try and that is one of the main reasons I decided to start the blog. Please try! If you're afraid of something not turning out picture perfect, you'll always fall short. But, if you embrace the fact that whatever you create will not only be a learning experience, but will also hold the memories of that experience, your creation will be that much more special. Try on!

Sunday, June 9, 2013

Organization 101

I had a brief moment of "oh my heavens, I have to clean" on Saturday. It lasted just about the whole day! But, I'm happy to report that it is now out of my system and life is back to normal.
During the cleaning frenzy, we successfully cleaned out Brooklyn's disaster of a room, Isaac's semi-disaster of a room and the hall closet. I'm most proud of the hall closet! This is where we store all of our board games. My kids love board games more than life itself. They are constantly dragging one game out of the closet after another. And like most kids their age, cleanup leaves a bit to be desired...
So, I came up with a seemingly perfect plan! Organization! Such a simple word that has eluded me for a long time. But, with four kids in the house, I decided that it was time to just suck it up and meet this four letter word (three four letter words actually).
Plan: Make the board games complete sets again and contain them so that they are always ready to play and, most importantly, easy to pack back up again.
I purchased snack, sandwich and jumbo sized Ziploc bags for this mission and spread out on the bedroom floor. Each game was re-organized with all of the necessary parts going into separate bags and then all the bags going into the jumbo sized Ziploc bag. I cut the label off the original box and attached it to the bag for quick reference and I have now reclaimed my hall closet!
The game of Life is now not taking over my life!

The game in the top row center is Monopoly! No more stepping
on little houses every time I open the closet door. 
 

Nine board games in a little bitty place!

Tuesday, June 4, 2013

Memory Quilts

One of the very coolest parts of my job is having the opportunity to create something special for my students that they will cherish for years to come. I teach high school chemistry (I know, you hated chemistry) and have long since realized that 99% of my students will never take chemistry again. I'm okay with that. So what I focus on is building relationships with my students, finding their strengths, and helping them find their passions in life. Every once in a while I get that kid who really connects with me and a great bond is formed. Those special kids are the ones that I create the memory quilts for. The quilts themselves are easy enough to make and take less than an hour from start to finish. But knowing that in 20 years, that student may look at that blanket and remember their high school chemistry...I get chills just thinking of it.
Step one: Gather old t-shirts. I generally shoot for 30 shirts. This can be fronts and/or backs depending on where the design is that you want to put in the blanket.
Step two: Lay the shirts out as flat as possible and trace a square on top. I use a 12x12 tile that was left over from a bathroom remodel (just in case you're wondering, home owners insurance covers 4 year olds!). Sharpie around the tile onto the shirt to create the cutting guide. At this point, and for the entire blanket as a matter of fact, DO NOT STRETCH THE T-SHIRT!
Step three: Cut the shirts out. Again, very important, DO NOT STRETCH THE T-SHIRT!
Step four: Lay out the shirts how you would like them. I recommend doing one row longer than you have columns. If you're doing the 30 shirt quilt, 5 columns and 6 rows makes a near perfect full blanket.
Step five:  Place the right sides of two shirts together and sew down just one edge.  I don't pin at this point because the shirts do a pretty good job of staying together on their own. Open the two shirts you just joined and lay the next shirt right side down on top of the shirt on the end. Continue until you have put all shirts together in that row and then repeat this step to complete all rows.

Sew that right side seam together.


Open where you just sewed the seam and continue to finish the row.

One row complete...five more to go.


Step six: Sew each of the rows together. Lay one row on top of the other row so that the right sides are together and the shirts on top are upside down. Remember that you will open up the two rows so they will be correct after you sew the seam. I do pin the rows together at this point. Line up and pin the seams created from when the rows were assembled.

Sew along that top edge where the shirts meet.

After you've sewn the top edge, the rows will open up and the shirts all facing the correct way!
One topper complete!

Step seven: Attach the back. This is where I cheat a little bit. I get a flat sheet from Wal-Mart and use this as the back of the quilt. Way cheaper than buying enough fabric to cover the back and already the perfect size, so new need to create seams on the back where fabric is being pieced together. Anyway, lay the quilt batting down, the flat sheet and then the t-shirt topper with the right side down. Sew along the outside edges and leave a gap at the end so that the blanket can be turned right side out. I leave about 1/2 of one shirt edge unsewn to flip.

Step eight: Flip! Reach your arm inside the quilt all the way to the opposite corner and pull. Easy breezy. Hand sew up the little hole that you left to flip and quilt is done at this point!